Friday, November 21, 2014

Holiday Card Shares

Thanks for joining me today! I'm excited to be sharing my guest design team projects for Little Blue Button Stamps.  I've had a blast designing for LBB and coloring all the wonderful digi images Olga has created. Be sure to stop by her website and check out her shop.

For todays projects I created three holiday/winter cards.

First up Is a winter card using the digi image, Miss Lilly and the Snowman.


I wanted to create with nontraditional holiday colors, so I used cobalt blue, brick red, and a teal aqua. I colored Miss Lilly with my Copic markers and used white metallic watercolor paint to create a unique look for the snowman. I also added different layers of pattern papers along with a snowflake embossed white piece of card stock for added texture. To finish off my card using Miss Lilly and the Snowman, I added a huge satin teal bow and some metallic snowflakes.


Next up, I used the digi image Caroling Sam. I colored him using my Copics in tones of blue and gray. I wanted to make the bell Sam was holding look as if it was a metal gold bell, so I used a gold modeling paste and painted it on. I love the gold old-world look the modeling paste gave to the bell. I wanted Sam to look as if he was outside ringing his holiday bell, so I added some white card stock along the bottom of my card cut in the shape of snow hills. Wanting to create more texture I added Wink of Stella and Diamond Dust to the snow hills. I cut strips of pattern paper and created a whimsical Christmas tree and placed Caroling Sam on the snow hill. I think he looks so adorable standing on the snow holding his gold bell and Merry Christmas sign.


For my final share, I created a softer more shabby look using Eris on Sleeping Bear digi. I don't tend to create shabby projects, but I'm in love with how this card turned out! This digi image is so, so adorable!!!! A must have for your holiday projects! Just like the other two cards, I colored the digi image with my Copic markers. I kept it super soft and airy. I added perfect pearls to the background of my image to make it look as if it's snowing. I used corrugated paper and a shabby woodgrain pattern paper layered on the base of my card. To finish off my card I added lace, ribbon and some flowers all in soft colors to give it that shabby look. 


I had so much fun creating these holiday/winter cards using all these wonderful digi stamps. Thanks LBB for the opportunity of guest designing this month!
Happy Scrapping ~ Leslie

Monday, November 3, 2014

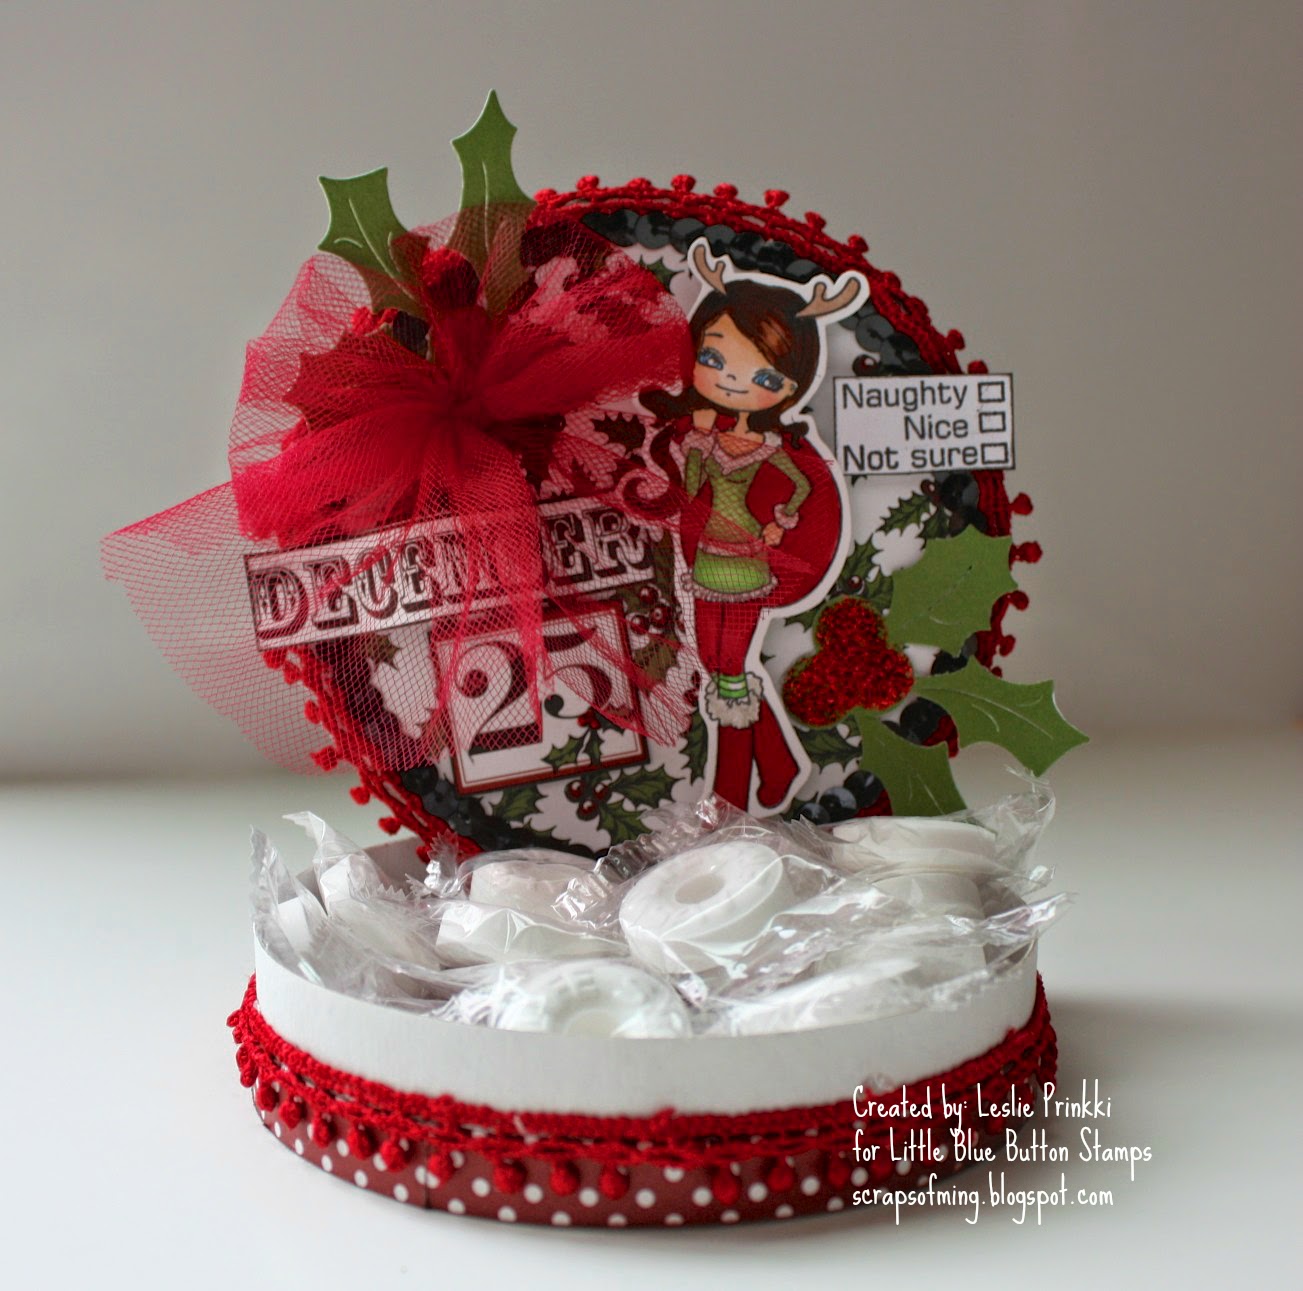
Altered Candy Box for LBBS

Thanks for stopping by today! I'm excited to share my guest design team project for Little Blue Button Stamps. Yesterday was the launch party for LBB stamps November clear stamp release. The launch party is two fun filled days of lots of great inspiration using the new clear stamps along with digi stamps. Click here to see a list of yesterdays projects as well as all the information on how to enter to win some great prizes. Don't forget to check out my youtube video and leave a comment there to be entered.

I created a Candy Box using the new stamp called Charlie with Gifts. I colored the stamp image using a variety of Copic markers, Chromatix and Spectrum Noir markers. I plan on filling my little alter box with mints and giving it away during the Christmas holiday. I love the final result of how adorable Charlie with Gifts looks on top of my altered Candy Box.


Remember to stop by Little Blue Button stamp's blog for all the information and links to all those participating in the clear stamp launch.  Don't forget to check out my project on my youtube channel as I share how I colored Charlie with Gifts. Oh, and don't forget to comment on everyones project for a chance to win one of many prizes.

Thanks for stopping by and happy scrapping!


Monday, September 22, 2014

Guest Designing for Kiwi Lane Today

Hello crafty friends!

I’m beyond thrilled to be back sharing my love of Kiwi Lane templates with you, as a guest designer this month.  I had such a fun time creating todays projects! Pairing Kiwi Lane templates with Bella Blvd is a match made in scrappy heaven!!! I “heart” both of these wonderful companies and I love how easy the templates work with Bella Blvd’s collections.

In August my family traveled back to Montana to visit relatives and friends. It has been several years since I’ve seen my parents so you can imagine I took a ton of family pictures. The Family Forever paper collection from Bella Blvd was perfect to capture some of our memories. I love combining different template sets together to create a one of a kind scrapbook layout.

Family Forever

Templates used
Rings 4
Sunnybrook Lane 1A
Scallops 1A
Adventure 4
Floral 2T

I had so much fun creating this layout, I decided to make another, but this time I created a pocket style layout. I love mixing traditional scrapbook layouts in my albums with pocket pages.

Life is An Adventure:

Templates used
Scallops mini 2B
Paisley Place mini 3B
Sweatheart 2T

For my final share today, I used the Max collection by Bella Blvd. I just love how fun and whimsical this “boyish” collection is.

My Boys:

Templates used
Chevrons 1B
Paisley Place 3A
Sunnybrook Lane 1A
Aspen Court 3B
Clara Lane 1A
Adventure 1 / 2
Accents 3T

It was a pleasure guest designing this month for Kiwi Lane! Thank you for having me on the blog today!!! I hope I have inspired you to mix and match your template sets and start creating those one of a kind scrapbook layouts.

Happy Scrapping! -Leslie

Tuesday, September 2, 2014

Where have I been?

That's probably the question you have been asking yourself. Wow! I can't believe September is here and the kids are back in school. Sorry I've been gone for awhile. Been busy on vacation and getting my kids ready for school. My daughter turned 13 (yikes) in August, my husband and I celebrated 20 years of marriage and the boys have been busy with sports and gearing up for hockey. I haven't had a chance to sneak away to my craft room since the kids have been back in school. I know that is so sad!!! I'm excited to be guest designing this month for Kiwi Lane Designs and I'm looking forward to playing with all the fun goodies they sent me. Though I may not be creating, I've been collecting new scrappy goodies. I hope to dust off my desk tonight and start creating! Oh how I miss my mommy time in my little craft room. Hope you had a wonderful summer, fall is almost here as the cool crisp weather has already appeared in my neck of the woods. (I'm so not ready to pack away my flip flops)

Happy scrapping!
-Leslie

Tuesday, July 22, 2014

A simple card share

Wow! I can't believe how fast summer is going by!!! If you are like me it's a challenge sometimes to keep up with my blog, creating youtube videos and keeping my kids happy this summer. Well, if you are not like me and you are not running around with your head cut off like a silly chicken, I'm so jealous! I've found some time to create but most of my creating is dedicated to my design team responsibility for My Style Stamps. I love coloring, it's so relaxing especially after having a busy day! My design team term with MSS ends this month, which makes me a little sad, but I'm so grateful for the amazing opportunity to design for this company.

Here's a simple card I created using the Beach Bum image from MSS. I wanted to keep this card as simple as possible and just let the image shine. I'm so happy with the way it turned out. I love it and I hope you love it too.


Enjoy the rest of your summer and happy scrapping!

Wednesday, June 25, 2014

Summer Pinwheel Wreath

Thanks for joining me today!  I’m honored to a guest designer this month for CutCardstock.com and I’m excited to share my summer time project with you.

This past winter sure has been a long one! I’m more than thrilled to be finally welcoming summer!!!  With that being said, I was asked to design a summer project using the Painted Art Origami collection. I knew right away I wanted to create a fun summer wreath for my front door. I must admit, I love creating wreaths for my front door for every season and holiday.  Here is a look at the supplies I gather to create my Summer Pinwheel Wreath, which includes the Painted Art Origami collection and 2 sheets of Stardream Metallic Cardstock in Fine Gold and Sapphire from CutCardstock.com.


I decided to create pinwheels using the origami paper. First, I glued two pieces of the origami paper together, pattern sides out. I repeated this step10 times. I then used a pinwheel template and traced the pattern onto each of the origami papers. Don’t own a pinwheel template, no worries there are tons of tutorials on the web showing how to create them. Once all 10 pinwheels were traced, I cut them out and hot glued the longest points of the pinwheel to the centers, creating a dimensional pinwheel.


I wrapped the straw wreath with the wire burlap ribbon making sure to completely cover the straw. I then positioned the pinwheels onto the wreath and used pins to secure them into place.


For my final steps, I added a burlap bow, a few colorful curly paper flowers and lastly, I cut a monogram P out of the Stardream Metallic papers for my last name.


I just love how whimsical, colorful and fun this Summer wreath is for my door. What a wonderful way to welcome guests to our home! I hope I have inspired you to create a wreath for your front door this summer,


Thanks for joining me today and happy crafting!

Leslie

Friday, May 23, 2014

MSS Release Day


Don't miss out!!! My Style Stamps May stamp release is tomorrow, May 24th!!!
Be sure to check out all the new stamp releases as well as all the new enamel dots and embellishments. 
Use coupon code MAY10 to get 10% off good 5/24-5/30.

Join My Style Stamps on Facebook, for inspiration using the new stamps to be released, as well as keep up to date on Monthly release dates and special events.


Friday, May 16, 2014

Watercolor Card using My Style Stamps

My latest design team project for My Style Stamps. I use the soon to be released stamp set "Build a Blossom". Super fun stamp set to use. In the video below I share how I used watercolor paints to color the stamped flowers. 


Be sure to visit My Style Stamps. "Build a Blossom" will be available May 24th.

Thanks for stopping by and happy scrapping!

Friday, May 2, 2014

May Kiwi Lane Blog Hop

Welcome crafty friends!

I'm honored to be back sharing my love of Kiwi Lane templates with you, as a guest designer for this months Kiwi Lane Blog Hop. 


If you are hopping in order than you have arrived here from the talented Lissa Mitchell's blog.

How does winning a $25 dollar certificate to the Kiwi Lane Shop sound? What a silly question!  One random winner from one of the blogs including the Kiwi Lane blog will win. Make sure you are leaving comments on all the Blog Hop blogs to be entered. You have until Sunday May 4th, at 11:59 MST to comment. The winner will be announced on the Kiwi blog, Thursday May 8th. 

As a past design team member for Kiwi Lane, I was beyond excited to be joining in this months hop!  I love all my Designer templates and continue to use them every time I create a layout!  If you haven't tried any of the templates be sure to pick yourself up a set or two and give them a try. I promise you won't be disappointed!  

For todays hop, I created a scrapbook layout using the Floral Accessory template set. I love working with Kiwi Lane templates because you can create directly from the templates as they come or if you are like me, I like thinking out side the box and creating other things from my templates!

Here is the layout I created using the template, Floral 1. Now you might be asking yourself, "I don't see any flowers?" You would be correct! Let me show you what I created using the template Floral 1.


Step 1: Trace the Floral 1 template onto card stock.
Step 2: Draw short lines between each flower petal, using the edge of the floral 1 template. 
(Shown above in the photo)


Step 3: Using an exacto blade or precision tip scissors cut down to the little line and across. This will create a small notch.
Step 4: Hand draw a small square and trace onto each flower petal, keeping the square just below the edge. 
(Shown above in photo)


This is what you end up with! Can you guess what it is? It's a view master dial.

You could erase all the pencil line or do what I did, turn it over! I decided to spray and splatter my view master dial with some ink in a sepia tone. (I used Van Dyke Sepia from Lindy stamp gang)
I then cut out a large circle in black card stock and attached it to the back.
I love how it turned out!


Here are a few more pictures of my layout using the Floral 1 template from the Floral Accessory set.


Other Kiwi Lane templates used include; Chestnut Drive 1B, Sunnybrook Lane 2A, Aspen Court 2B, Paisley Place 3A, Sweetheart 2 and Adventure 4.

Thanks for hopping with me today! Don't forget to leave a comment for a chance to win $25 to the Kiwi Lane shop. I'd also love if you became a follower on my blog as well. (wink ;)

Up next on the hop is Connie.

In case you've hopped out of order here is a list of the blog hop line up.


  • Kiwi Lane http://kiwilane.com/here/blog/
  • Lissa http://mightycrafty.blogspot.com/
  • Leslie http://www.scrapsofmine.blogspot.com/ *You are here now*
  • Connie http://conniecancrop.blogspot.com
  • Sandi http://lifeatthebeach51.blogspot.com/
  • Christine http://scrappingwithchristine.blogspot.com/
  • Alicia http://goldengoddessdesigns.blogspot.com/
  • Suzanne http://goldengoddessdesigns.blogspot.com/
  • Roselyn http://prettylittlepackages.blogspot.com/
  • Arin http://apieceoflifespie.com/